Let’s Begin…
As Salesforce Consultant’s, we are always looking for quick and easy wins that will both benefit our clients greatly, but also be simple to implement and manage from our end – that way we all win! Processes that automate routine tasks always helps to improve the quality of of an Org and the End User’s experience. Today, I want to show you one of the first flows I learnt to make in Salesforce which should hopefully serve as a good jumping on point to Flows if you have never built one beofre, but to also offer a really tangible and useful solution to your Org!
We will be making a Flow today that creates a Meeting in your calendar for you automatically based upon you populating 1 field in Salesforce. That’s it. How cool is that!?
1. Create your Date/Time Field
As Event (the Standard Object Salesforce uses to log meetings into your Calendar) records in Salesforce require a Date/Time Field for their Start and End Dates, we need to ensure we have a Date/Time Field on the object we want to trigger this process from.
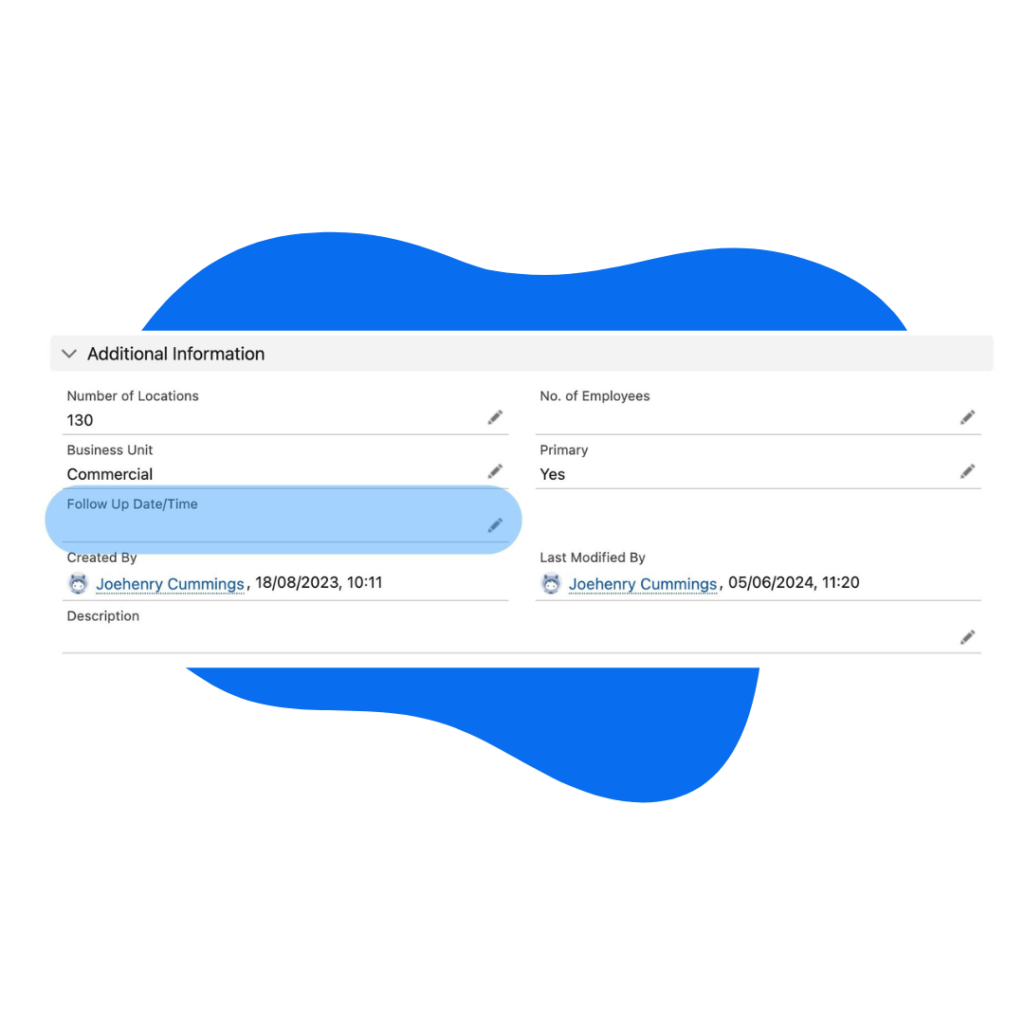
In our scenario, I want to automatically create a Meeting (Event record) for a Lead when I populate the Follow Up Date/Time field. As a result, I will create the Date/Time field on the Lead and add it to my Page Layout.
2. Create your Record-Triggered Flow
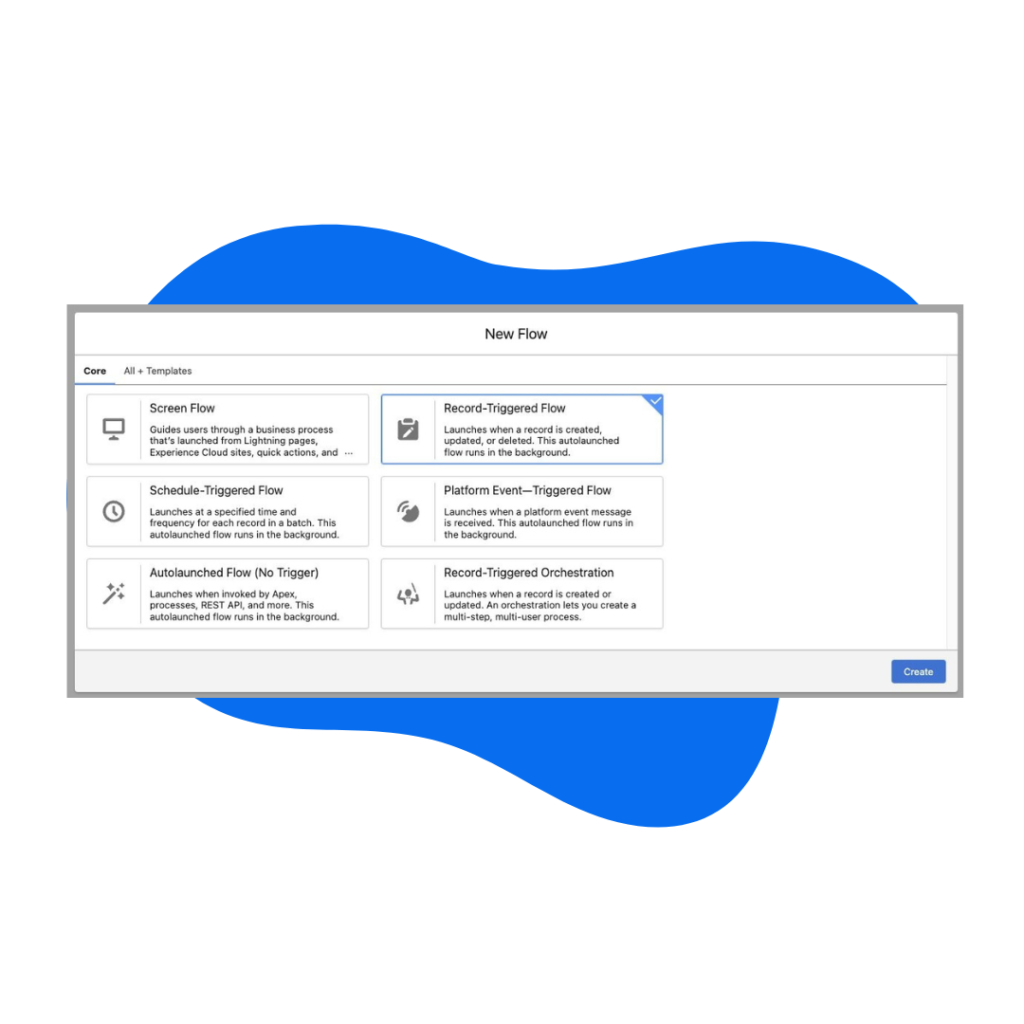
Within the Salesforce Setup Menu, search for “Flows”. Click “New Flow” and you will be asked to choose which type of Flow you would like to make. Salesforce offers many great options for Flows that cater to a wide variety of different scenarios. As we want to trigger an automation when we make a change to the Lead (when we add a value to the Follow Up Date/Time field), we want to choose “Record Triggered Flow”.
3. Enter your Triggering Criteria
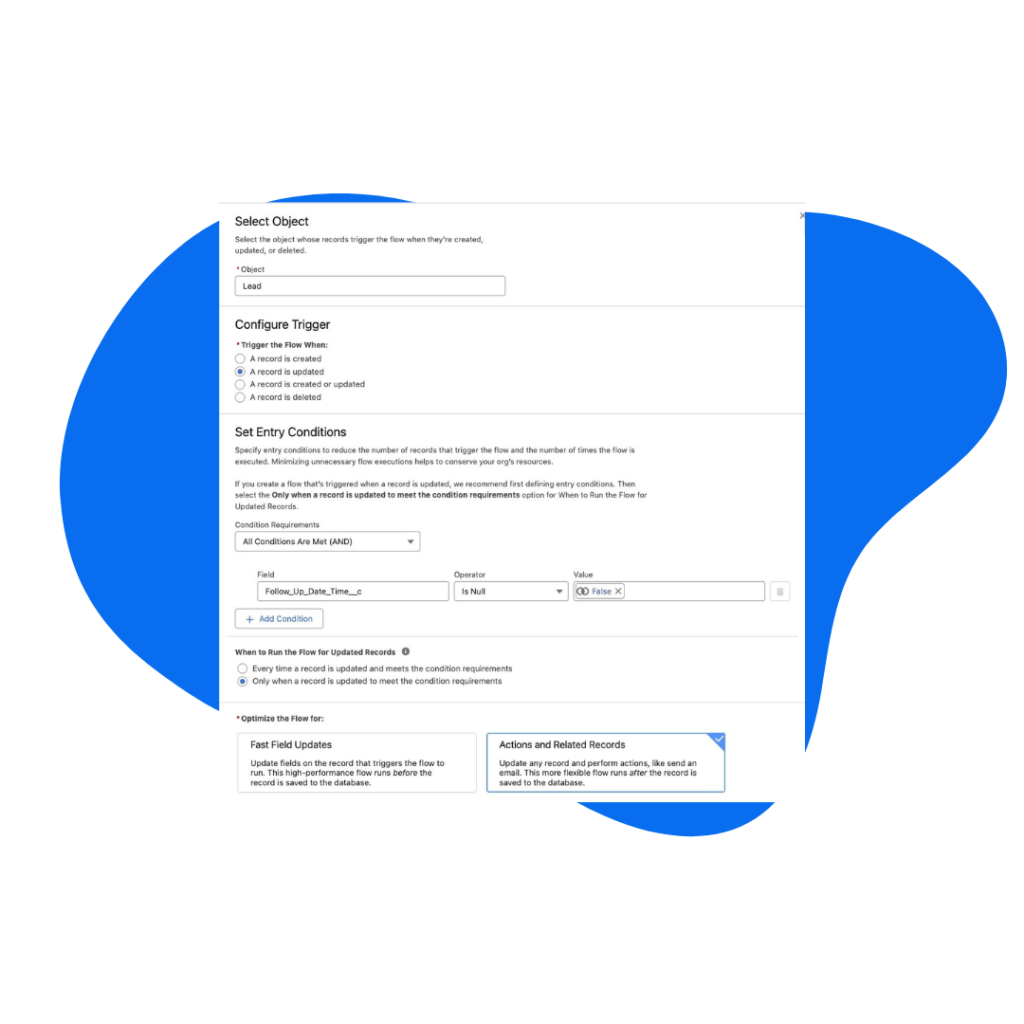
One of the great things about Flows in Salesforce is we can choose exactly when they run. This prevents us from running flows unnecessarily and potentially slowing down the system and running into usage limits. As we want to run this process only when we Update our Lead record and populate the Follow Up Date/Time field we will use the following criteria.
Object = Lead:
- This ensures we are only looking for Lead records in Salesforce to trigger this process.
Trigger Flow When = A Record is Updated:
- This ensures the process will only run when a Lead is Updated and not Created.
Entry Conditions = Follow Up Date/Time Is Null = False:
- As we only want to run the Flow when we have a value in the Follow Up Date/Time Field we will use the Is Null operator to allow us to assess this. We know when when it Is Null, it wont have a value, so we are choosing to run the Flow when this is false.
When to Run the Flow for Updated Records = Only when a record is updated to meet the condition requirements:
- Using the above criteria, if we were to choose to run this Flow every time a record is updated and meets the condition requirements this would trigger whenever we made a change to the Lead if it had the Follow Up Date/Time populated. By choosing the other option, we are ensuring we only run the Flow when the Follow Up Date/Time is populated.
4. Create your Formula Fields
In order to ensure the Meeting (Event record) we are creating in Salesforce is fully customised to suit our needs, we need to create a couple of small Formulas that our Flow can then use to populate key fields on the Event record automatically.
In this scenario, I knew I wanted the Subject of the Meeting to be customised to the Lead it is being created for and I wanted each Meeting to last 1 hour. As a result I needed to make the following 2 Formulas:
1. A Formula for the Subject of the Meeting (Event)
2. A Formula for the End Date/Time of the Meeting (Event)
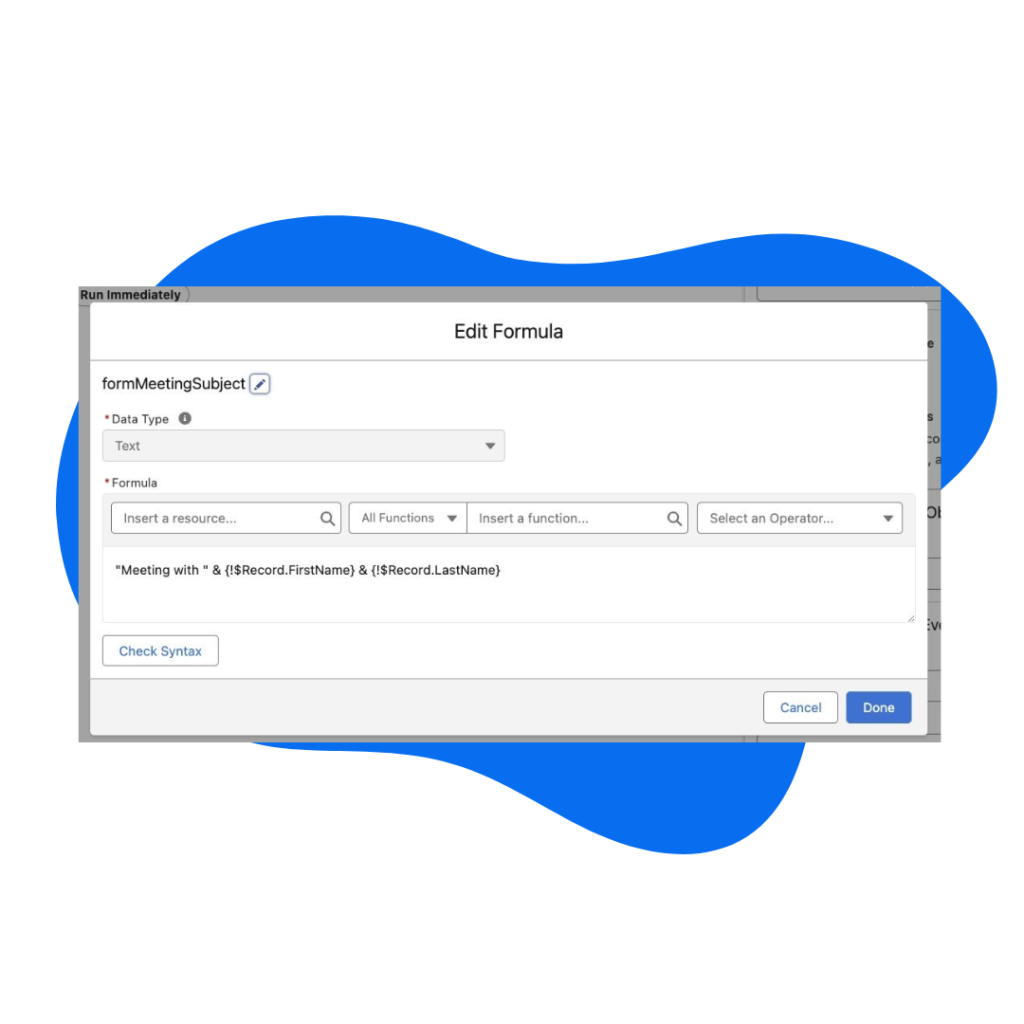
Subject Formula:
For this Formula, I wanted to combine the Name of the Lead with the text “Meeting with ”. As a result I created the following Text Formula which I would then use later to populate the Subject of the Event record:
“Meeting with ” & {!$Record.FirstName} & ” ” & {!$Record.LastName}
The above formula works as follows:
1. “Meeting with ”
will populate the start of the Subject with Meeting with
2. & {!$Record.FirstName}
will add the First Name of the Lead to the Subject
3. & ” ” &
will ensure there is a space between the First and Last Name
4. {!$Record.LastName}
will populate the end of the Subject with the Last Name of the Lead
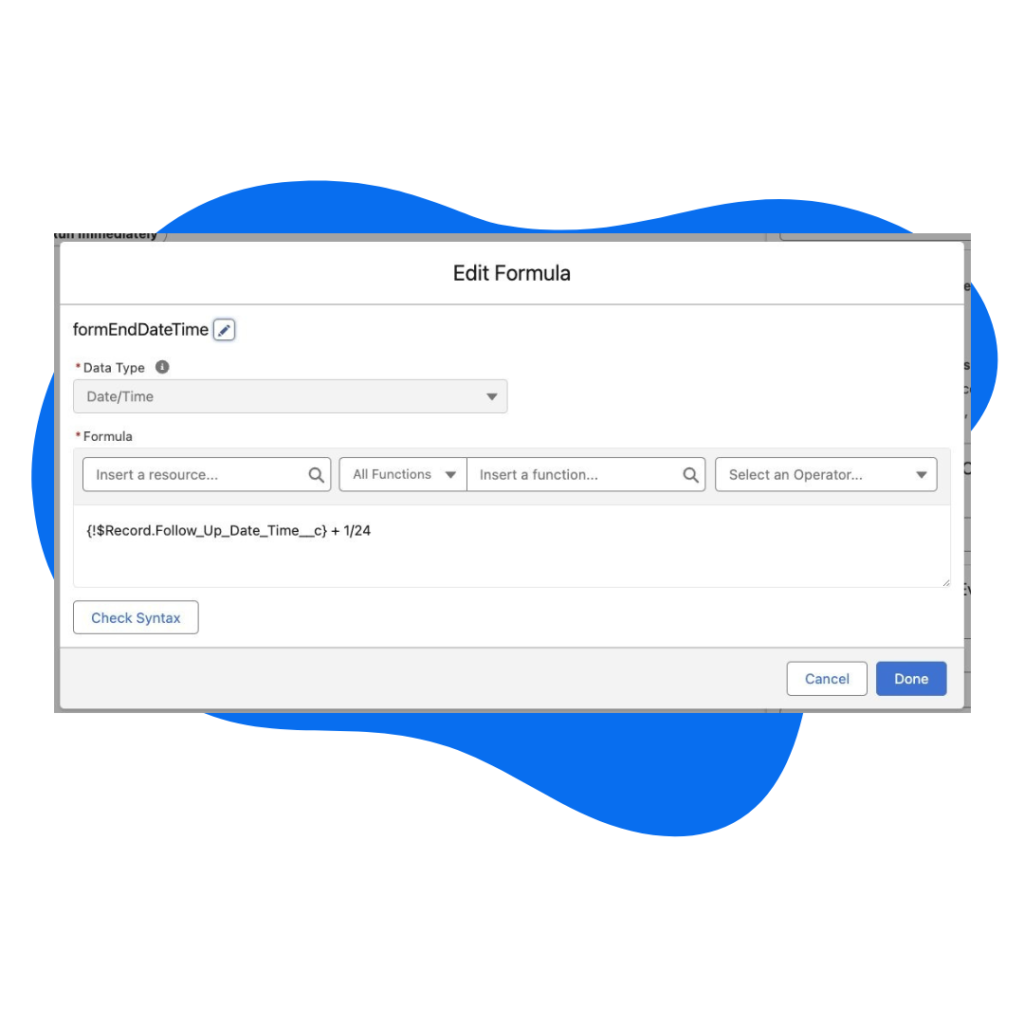
End Date/Time Formula:
For this Formula, I knew I wanted to add 1 Hour to the Follow Up Date/Time as I wanted to log the Follow Up Meetings in Salesforce as 1-Hour Long. As a result I needed to use a Date/Time forumla field where I added 1-Hour to the value in the Follow Up Date/Time Field:
{!$Record.Follow_Up_Date_Time__c} + 1/24
The above formula works as follows:
1. {!$Record.Follow_Up_Date_Time__c}
Takes the value that we populated in the Follow up Date/Time field in order to trigger the Flow
2. + 1/24
Adds 1 24th of a full day (aka 1-Hour) to the Follow-Up Date/Time value. As Date/Time fields look at 1 as a full day, we needed a way of taking 1-Hour of a day, this was achieved by dividing a day by 24.
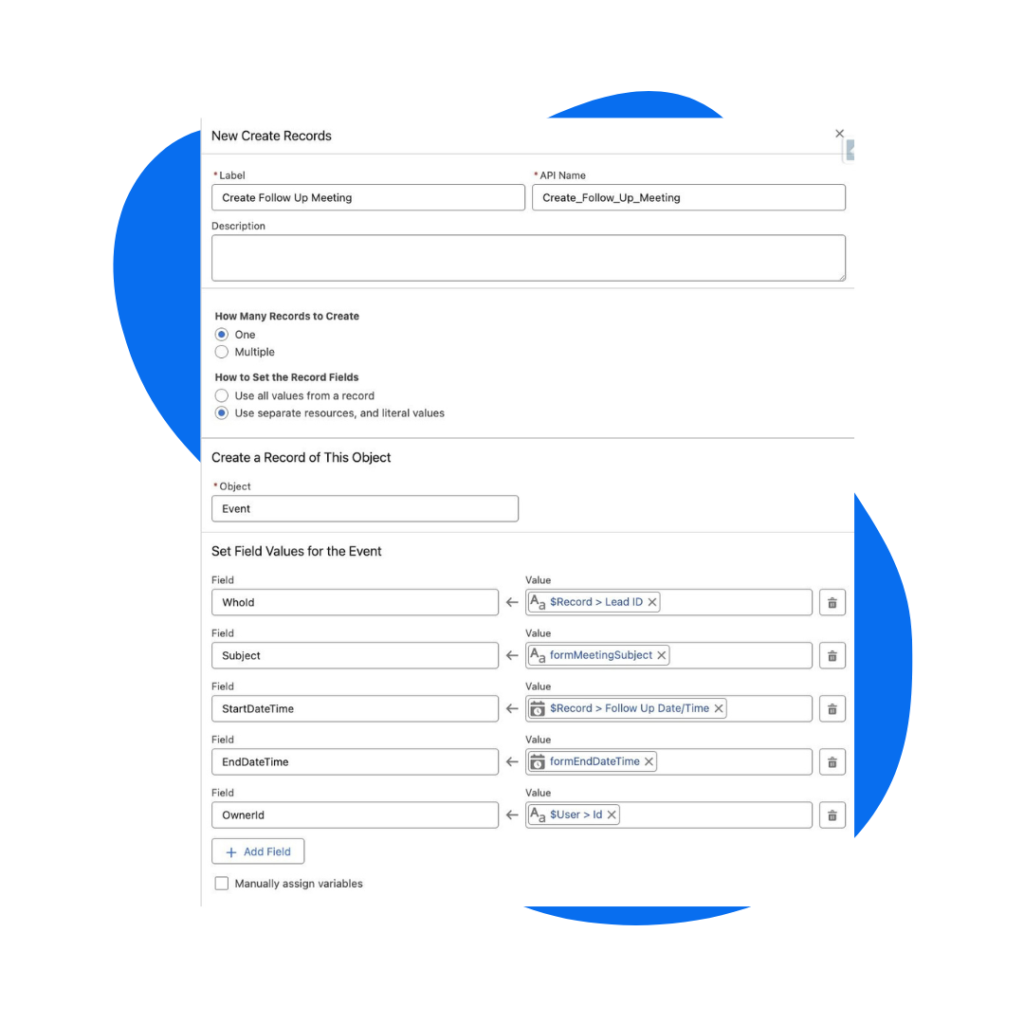
5. Create your Follow Up Meeting Record
Now we have determined when we want to trigger this process and set some of the values we need for our Meeting (Event record), it is time for us to create the record! In order to do this, we need to use a Create Records element within the Flow. Let’s add this to the Flow and configure it as follows:
Object = Event
- This ensures the record we are telling the Flow to create when we trigger the Flow is an
Event record, which Salesforce uses to log Meetings and populate Salesforce Calendars with.
WhoId = Record ID
- The WhoId within an Event record determine the Contact or Lead the Meeting is associated to in Salesforce. As we want this to be associated to the Lead that triggers it, we need to use Record.Id to populate this value.
Subject = Meeting Subject Formula
- Using the formula we made in step 3, we will simply populate our Subject and it will automatically take the name of the Lead and combine it with “Meeting with “.
StartDateTime = Follow-Up Date/Time
- This is the field we are populating to start this process so we just need to take use this value for the Start Date/Time of the Event record to ensure the Event that is created is in line with the value we populated.
EndDateTime = End Date/Time Formula
- We have already made a formula to add 1-Hour to the end of our Follow Up Date/Time, so all we need to do here is populate this field with the formula we created in step 3 and the meeting will alway be 1-Hour long!
OwnerId = User ID
- The Owner ID field determines who the Event record is assigned to. I wanted to ensure that whoever populated the Follow Up Date/Time field on the Lead record was automatically assigned to the Event to ensure it populated in their Calendar. To achieve this, we can use the User ID value that is available to us in the Flow builder.
6. Test and Activate
Once you’re happy with the Flow you have made, give it a Debug and test by using the Flow Builder’s Debug feature. If all goes well, activate it and start utilising your handy, time-saving feature and booking in those follow up meetings!
In this example, I have activated the Flow and then proceeded to update a test Lead record with a Follow Up Date/Time. This in turn created a customised Event record and added it into my Salesforce Calendar for future reference!
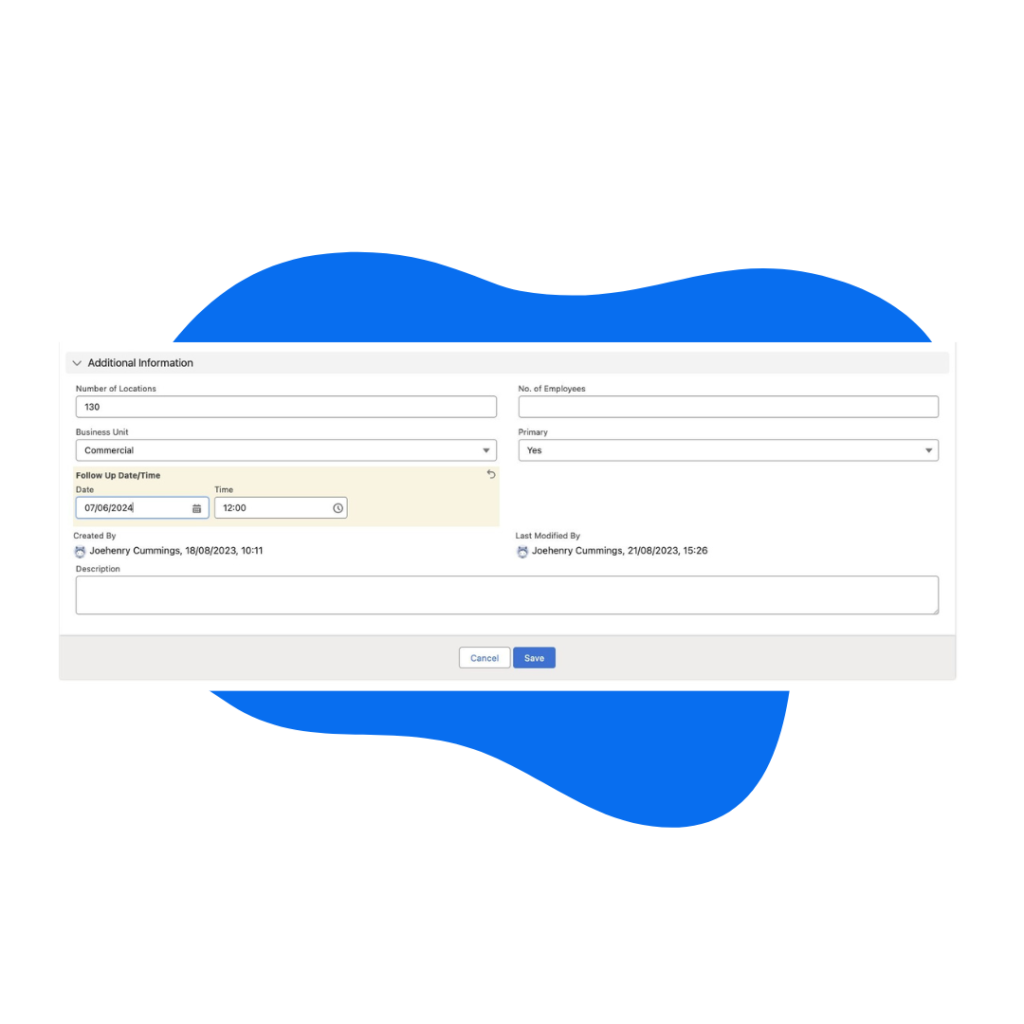
Populating the Follow Up Date/Time field will trigger this process.

This in turn has then automatically created an Event for me and added it into the Activity Feed.
Thanks for reading!
-Joehenry Cummings