
NEW from the Tether Tips Blog – Setting Up Lightning Landing Page Builder
The first tip of 2022 from one of our Pardot and Salesforce consultants, Joehenry Cummings.
Why Should You Care About the Lightning Landing Page Builder?
The Winter ’22 release for Salesforce not only brought with it a range of enhancements for Salesforce, but also introduced some highly anticipated features for Pardot users as well. The most exciting of which for me personally was the long-awaited Lightning Landing Page Builder.
Whilst the previous landing page builder offers some great functionality, it’s template based editor sometimes left users with little HTML knowledge (like myself) wondering where to turn to customise the finer details of each page. With the new lightning based builder, users can easily create and customise landing pages in just a handful of clicks.
You may have already seen our article that breaks down why this new builder is a game-changer for marketers, however, for those of you that are new here; it allows user to create landing pages in less time and access customisation options easier than ever before.
How to Get Started: Essential Housekeeping
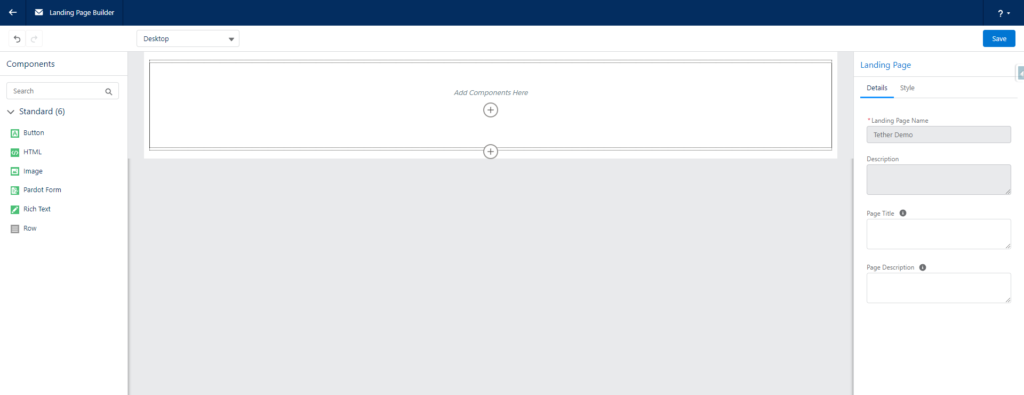
So you’re sold on the new Lightning Landing Page Builder, but you’re wondering how to get started setting it up? Not to fear – I’ve been in your position before which is why I’m here to help you out! By default, Salesforce do a great job summarising the set up procedure through the Marketing Set Up, however, I thought it would be useful to provide a step-by-step guide to refer to as well.
Before we dive in there are a few pieces of housekeeping we need to check off:
- You must be using at least Salesforce Professional edition.
- You must have the Pardot Lightning app installed.
- You must have Handlebars Merge language enabled (HML).
- You must have Connected Campaigns enabled.
- You must have Salesforce CMS.
That may seem like a lot, but chances are, if you have been using Pardot over the past year, you will have more than likely already actioned points 1-4. So, whilst we won’t be covering them here, there are loads of great resources out there to help you get started. So that leaves us with point 5: Salesforce CMS.
How to Set Up Salesforce CMS?
I plan of putting out an article breaking down exactly what Salesforce CMS is and does, but in relation to our Lightning Landing Pages, all we need to know is this is where we will be storing all of our assets such as logos, headers, graphics etc. that we plan on using on our brand new Lightning Landing Pages.
In order to set up Salesforce CMS you need to create and assign the Use Pardot Content Experience permission set. It’s worth noting – this is the same permission set needed to access the new landing page builder, handy right!?
Create this Use Pardot Content Experience permission set by going to the Marketing Set Up and under Set Up for Marketing Automation, click Content Set Up.
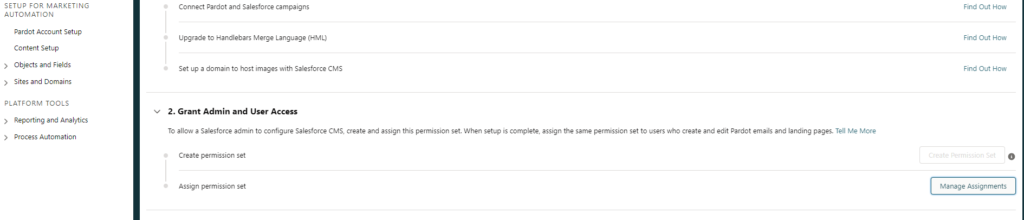
Once created, assign the permission set to any users who will need access to the Lightning Page Builder and Salesforce CMS. With these permissions in place, we need to configure a channel and workspace to host our assets.
Configuring Your Channel and Workspace
Now we have access to CMS, we need to create a Channel to share our marketing assets and a Workspace to store and organise the assets needed for our landing pages with other users in our organisation. You can think of the Channel as the ‘hub’ for all our Pardot materials and the Workspace as folders to organise these assets.
Access Salesforce CMS either through the same Marketing Set Up menu we used before (Content Set Up) or via the App Launcher by searching for CMS.

CMS Channel page
From here, select the Create Channel button in the top right and configure it to suit your needs (this will be your ‘hub’ for your marketing assets). I like to create a Channel called Pardot to store all my Pardot material in once place. You have the option to make this a Public or Private, be sure to make this Public in order to be able to access the content correctly from the builder.
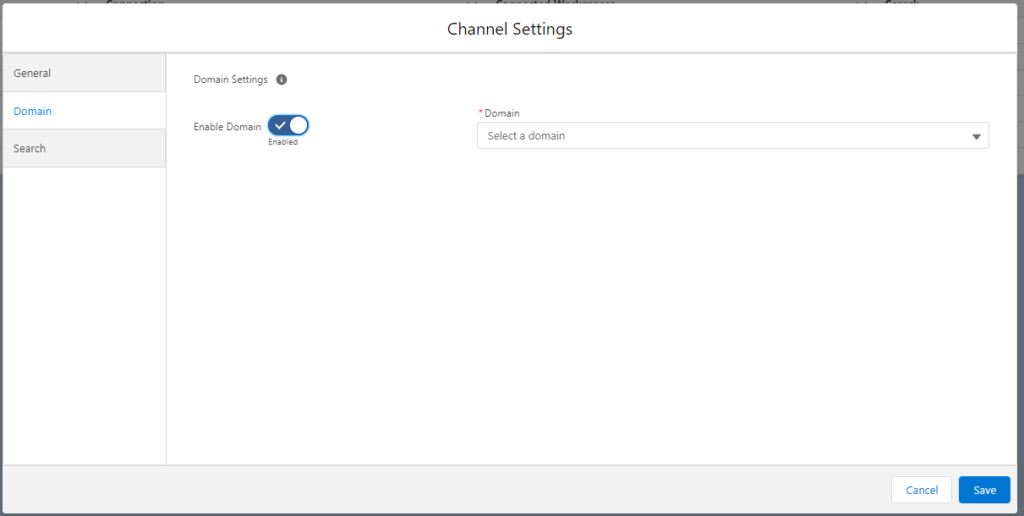
One gotcha that’s caught me out more than once is not remembering to enable the Channel. This can be done from the Channel menu by selecting Edit from the action menu next to the Channel, toggling Enable under the Domain menu and then selecting the desired domain.
With this configured, we need to set up set up our Workspace (folders to organise the content) from the CMS Workspaces action menu. From here, select Add Workspace from the top right and a window will appear to guide you through the steps. You will be asked to do the following:
- Name the Workspace and optionally give it a description. I tend to create a folder for each marketing asset i.e. Landing Pages, Email Templates (once CMS is configured once it can also be used for the Lightning Email Builder) etc.
- Select the Channels that can use the content stored in this Workspace. Choose the Channel you just configured.
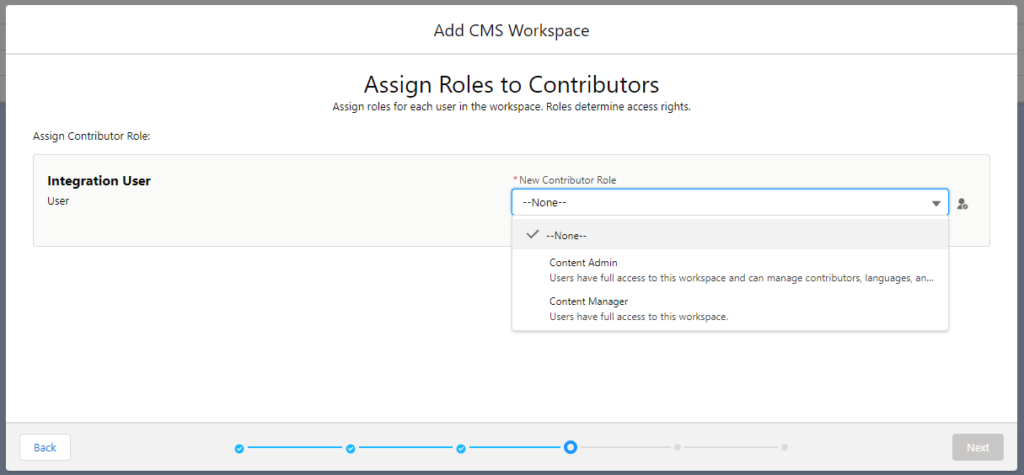
- Add any contributors to the Workspace. These will be the users responsible for creating Landing Pages.
- Assign either the Content Admin or Content Manager role to the users. Content Managers have full access to the Workspace and can upload and edit files within it. Content Admins have all the same privileges as Managers, but they can also manage contributors, languages and sharing within the Workspace.
- Select the languages and default language of the content within the Workspace.
Now we have our shiny new Channel and Workspace configured with all of our relevant users assigned, we have one final step to take (don’t worry, this ones easy) – selecting a Channel to use with Pardot Content Experience (where does the Landing Page Builder need to look to find our marketing materials).
Back in the Marketing Set Up, find the Content Set Up menu again and at the bottom click Select Channel and choose the previously configured Channel.
And just like that, you’ve configured your CMS! This is used for both the Lightning Landing Page Builder and Lightning Email Builder, so if you choose to use this as well, a lot of the set up will already be complete. With this done, we only have one more thing to do…
Enabling the Lightning Landing Page Builder
The final key required to unlock our new Lightning Landing Page Builder is enabling it. Lucky for us, it is already installed, we just need to make sure our users can access it easily. As I mentioned earlier, make sure anyone who needs access to the Lightning Landing Page Builder has been granted the Use Pardot Content Experience permission set (they should already have this from when we set up the CMS).
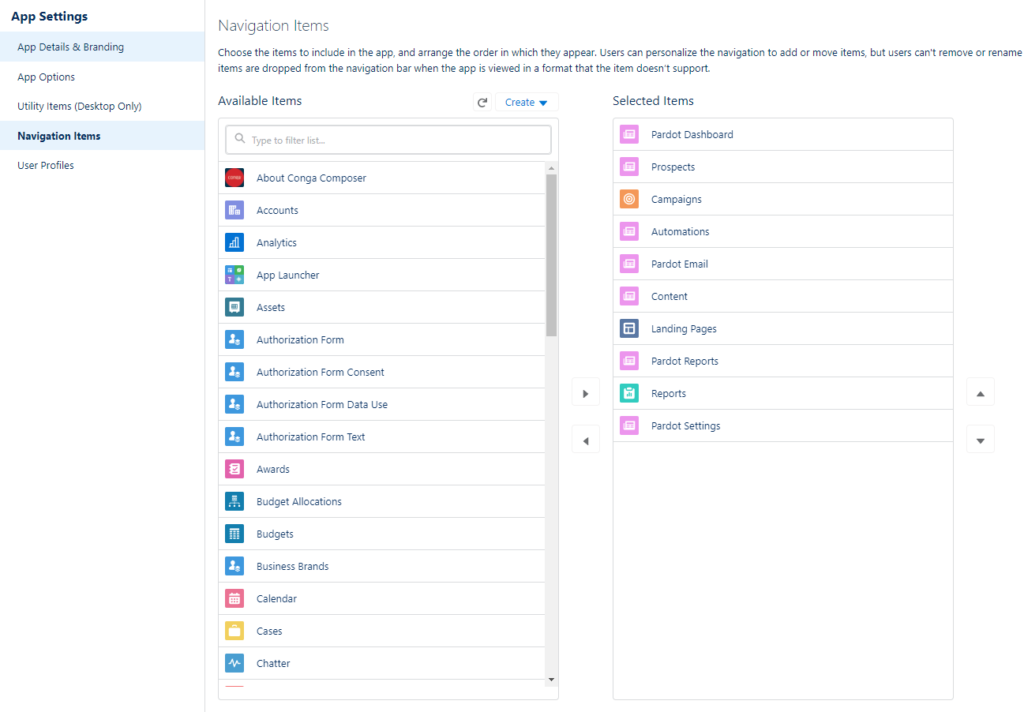
As part of the Winter ’22 release, Pardot implemented the new Landing Pages tab into the Pardot Lightning App. However, by default, this tab is not added to the navigation bar – let’s fix that.
Within your Set Up menu, search for and select App Manager, find the Pardot Lightning App (indicated by word Lightning under App Type) and select Edit from the action menu.

From here, select Navigation Items from the menu on the left hand side and add the Landing Pages tab over from the Available Items column to Selected Items column. This will add the Landing Pages tab to our Pardot Lightning App and allow our marketers to access the new builder right away!
Another gotcha that has caught me out before is still not being able to see the new Landing Pages tab in the Pardot Lightning App, even after following the steps above. If this happens, ensure that the Landing Page tab has been changed from Tab Hidden to Default On within the Profiles used for each of your Pardot users.
Summary
The new Lightning Landing Page Builder is an awesome tool that can prove invaluable in landing page creation, however, it can be a tad intimidating to initially set up, especially if you are new to Pardot and are looking to get the most out of its latest features.
We hope this guide has helped you get started with the new Lightning Landing Page Builder. Now, get out there and start creating some great looking landing pages!
Thanks for reading,
The Tether Team
#salesforce #salesforcecrm #tethertips #crm #pardot #lightning #landingpage