CPQ. am I right?
It’s fun enough doing out-of-the-box implementations but what happens when even CPQ isn’t enough?
Well good news everyone because Salesforce is back at it again with the new and improved CPQ plugin framework – https://developer.salesforce.com/docs/atlas.en-us.cpq_dev_plugins.meta/cpq_dev_plugins/cpq_plugins_parent.htm
What is the CPQ Plugin Framework?
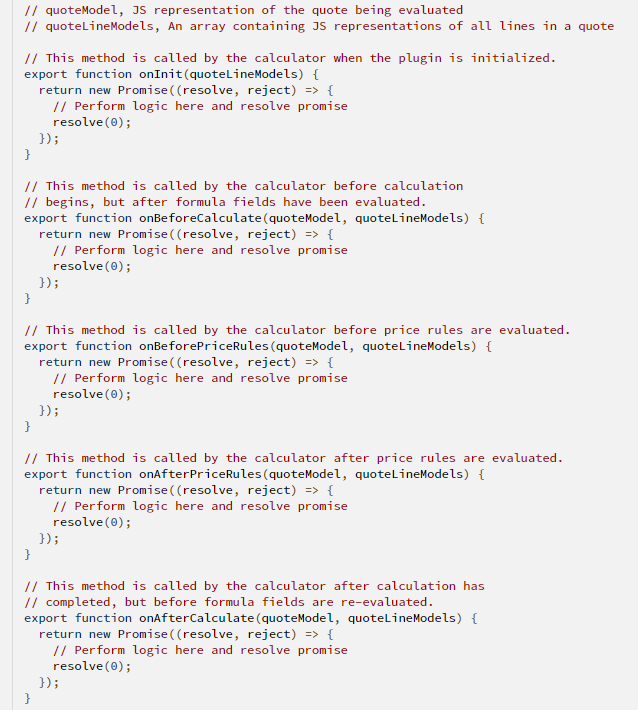
The CPQ plugin framework uses JavaScript instead of Apex and works similarly to Apex Triggers, like Triggers the framework uses several specific functions to dictate when code should or can be run, you can see a full JavaScript template with all of the supported functions below.
Writing a Custom Pricing Engine
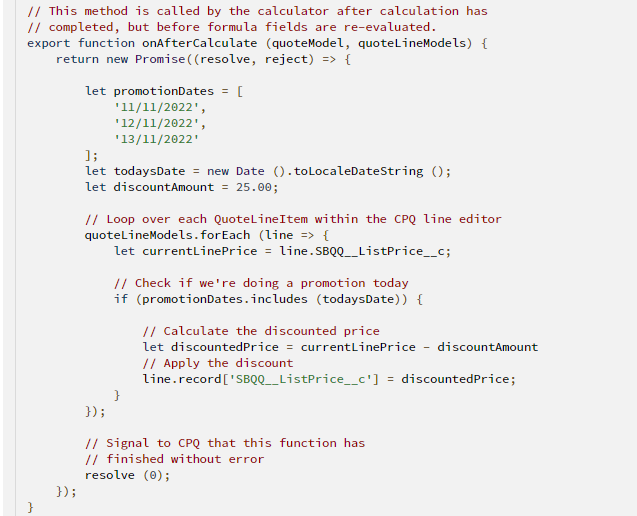
With our newfound knowledge, let’s write a pricing engine of our own. In our example we are going to give a discounted rate to products that are purchased during a certain weekend after the User clicks the ‘Calculate’ button in the CPQ line editor.
The required JavaScript code is as follows:
Important Considerations
We need to note a few things here, the most important being how we interact with the quoteLineModels, to read fields from the record we need to use ‘line.FIELD_NAME’, when editing the record, we need to use ‘line. Record[FIELD_NAME]’ as they only this ‘record’ is editable to the plugin.
The other things to note are that the variables are all hard coded within the code, of course in a real scenario this information would be stored in records or statically within Salesforce.
Deploying the Pricing Engine to CPQ
Now we need to deploy our new pricing engine to CPQ, in order to do this please follow these steps:
- Login to the CPQ org
- Go to Setup
- Search for ‘Installed Packages’ and click the ‘configure’ button next to SalesforceCPQ
- Click the ‘Plugins’ tab, find the ‘Quote Calculator Plugin’ field on the lower right side
- Type in the name of your plugin like ‘ProductPricer’ or ‘PromotionEngine’, this will be needed for later as we’re going to create a record in Salesforce with the same name
- Click Save, then on the App Launcher and search for ‘Custom Scripts’
- Create a new Custom Script record, only 1 of these records may exist in the org
- Paste the name you chose to call your Plugin in step 5 into the Name field
- Copy and paste (I know!) your JavaScript code into the Code field
- Fill in Quote Line Fields with a list of Fields referenced within your code, in our case put SBQQ__ListPrice__c
- Click Save
Testing the CPQ Plugin
To test it, head over to a Quote record and click ‘Edit Lines’, add a product and then click ‘Calculate’, you’ll be able to see the list price update minus 25 (but be warned, this page likes to cache data!).
Congratulations, you’ve created and deployed your first CPQ plugin!
Thanks for reading,
Daniel Edwards
The Tether Team
#salesforce #salesforcecrm #tethertips #tether #cpq #plugins
Frequently asked Question
1. What are custom address fields in Salesforce?
Custom address fields in Salesforce allow users to create address fields tailored to their business needs instead of relying solely on standard address fields. These fields provide flexibility for data entry, validation, and integrations while supporting state and country picklists.
2. Can I use custom address fields in Salesforce reports and dashboards?
Yes, custom address fields can be included in reports and dashboards, but they function as independent text fields. If state and country picklists are enabled, you can filter and group records more efficiently.
3. How do custom address fields handle state and country picklists in Salesforce?
When enabled, custom address fields can use state and country picklists, ensuring consistency in data entry. Users select predefined values instead of manually entering text, reducing data inconsistencies.
4. How do custom address fields interact with Salesforce APIs and integrations?
Custom address fields are accessible via Salesforce APIs but are treated as separate fields rather than a unified address object. If integrating with external systems, ensure proper field mapping to maintain data consistency.